Hi friends,
Every once in a while I like to throw something different out here, so I’m really excited about today’s project.
The Katy area is chock-full of photographers who can photograph you and your family — and some of those people are downright FABULOUS. I’m delighted to be friends with some of the best locals around. While I love to work with your teens who really would prefer to be hanging with their friends than taking ‘FAMILY’ photos to make mom happy, than sugar-crazed toddlers, I have the resources to take care of TODAY. See, these collleagues of mine happen to be particularly WONDERFUL Childrens’ photographers. That’s right. If you call me for a photography job that I think is more suited to someone else, I will do my darndest to get you together. After all….. You have a choice, and a four-year-old is WAY DIFFERENT from a High School Senior.
SOOOOOO….. If your kids are beyond the new walker stage and younger than 10, SPCcreative MAY NOT be the best studio for you. HOWEVER….. I have connections…. YES!!!!! RIGHT HERE IN KATY!!!!!!
Just for grins, my close-circle of local professional photographers has started a blog circle. You can read through a selection of our blog posts and then follow a link to yet another one of our colleagues. Be to follow the circle all the way around until you get back to where you started.
UMMMMMM…… That would be ME!!!! HELLLOOOOOO!
Our blog circle this month centers around the theme of SUMMER.
So, even though you already know that I specialize in portraits — and there’s NOTHING I love more than high school seniors and teenagers, this is where I”m letting my LEFT BRAIN …. or maybe it’s the RIGHT take over. Whatever it is, OTHER LOGICAL SIDE — SHUT UP and let me play!
Come join me as we PLAY in the backyard garden.

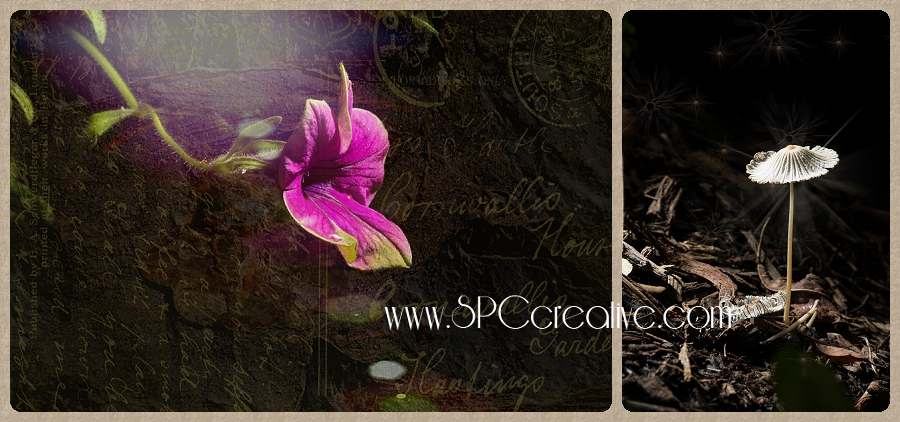
All of these images were created in broad daylight, but I used my flash to darken the background and eliminate distractions.
What’s that? you say… Use a flash to make it dark?
YEP! . You’d never know that just a few feet behind this lovely Picasso’s Fantasy Petunia hanging basket there’s a white garage, would you.
Wanna know how it’s done?
First, you do need a camera that allows you to use the manual settings, and you’ll to know some basics about how your camera works.
You also need a flash unit that allows you to control the strength of the flash, and it’s WAY COOL if you can trigger that flash from off the camera.
Okay — if you need help, go get your manual. It’s okay. I’ll wait.
This will be a little bit technical but I am SOoooooooo not a techie person that I HOPE I can explain the steps in a way that makes sense to you and me both.
If you don’t know how to adjust a few settings on your camera, take a moment to read up on them. They include turning OFF all automatic settings and putting your camera in MANUAL mode, then adjusting your
ISO, Shutter Speed, and Aperture.

There’s NOTHING automatic about this little exercise, so the very first thing you want to do is shift your camera over to the MANUAL mode.
Thats the M on the dial that probably also has a little green square. Maybe there are some pictures like a flower, a runnnnnning guy, and a mountain. You might also have other letters like B, A, T, & P — but we want the M as in Monkey or Moon or . . . Magic.
Got it? Now you’re TOTALLY in charge of your camra. Feel empowered? Let’s go on.
Next, lets set your camera so that it reads very little of that bright summer outdoor light. So find your ISO setting.
ISO stands for International Standards Organization, but that doesn’t matter. It simply affects how fast your sensor collects the light once it’s let in. The controller is probably on the right side of your camera near the shutter button, but use your manual if you need help finding it.
Choose the lowest number available.
I don’t speak Nikon, but most Canon cameras typically go down to 100.
Next you want to set your shutter speed so that it is as fast as possible without outpacing your flash. Some systems can go as fast as 1/250 of a second before you have to make a battery-draining high speed sync adjustment to your flash. On other models you may only go up to 1/200 before high-speed sync becomes necessary. We don’t want to fool with the high sync thing, but if you shoot faster than your flash will allow, you’ll only get about half a picture. Nobody wants THAT!
Still with me? Great! Go ahead and set your shutter speed at 200.

Next you want to adjust your aperture (that means the size of the hole that opens up in your lens to let light in) as small as possible so that it doesn’t let in much light at all.
Here’s where things get wonky. The higher the aperture numbers go, the SMALLER your aperture really is. So….. if your aperture is set on 2.8 or 5.4, the hole is really big, and lots of light gets in. That’s great for if you want to freeze action, but that light just comes into the camera and goes EVERYWHERE – and for THIS project we want to block out most of our surrounding light so that we only see the light that our flash puts on the subject.
NOW… with your shutter speed set fast, start adjusting your aperture to the bigger and bigger numbers — smaller and smaller hole — until you can take a picture and the result is totally (or nearly all) black. 20 or 22 is usually pretty good. Once you get a black image, stop. Keep those settings where they are.

NOW — we’re going to bring in the flash.
Be sure it is set on its manual setting too, not automatic or ETTL, or it will try to do the thinking for you and you’ll just get whatever exposure the camera thinks is normal.
Start with the flash at about 1/8 power and hold it about 3 or 4 feet away from the subject …. we’ll just say it’s a flower since it’s summer and things are blooming like crazy.
Be sure the flash is pointing DIRECTLY at the flower.
Take a picture.
What did you get? Is it all still black or too dark? If so, there are two things you can do. Either move the flash closer to your flower, or turn the power up a stop to 1/4 power — but not both!
Is your subject over-exposed? Then what do you think we’re going to do?
BINGO! Turn the flash power DOWN or move it away from your subject. How cool is that?
This is where it’s super fun to have a flash that you can fire from off your camera. Once you find the exposure and flash distance that works for you, you can move that light around and experiment. Try placing the flash above your flower pointing straight down …. now try one with the flash off to the side or even behind or underneath the flower….. Pretty cool to see the light falling on just one part of your flower, isn’t it?

The light came from behind this little baby dragonfly. That’s why his legs have that pretty rim-lighted effect.
Can you guess where my light was for the mushrooms? That’s right, it was at about 10 o clock to the subject and was laying on the ground.
Now, the plumeria picture is a cheat. The sun was actually shining right through the petals so I made some quick adjustments and took that picture without any flash at all, but I still used the same principles, making the swimming pool background a deep dark teal instead of black.

Think you want to give this a try? I believe you can do it too. I’d love to see the images that you can come up with.
Go play and let me hear and see how it goes!
NOW — so the SUMMER-THEME circle remains unbroken, click THIS LINK to get to know my fellow photography buddy, Desi and what she and her ADORABLE kiddos have been up to this summer.
And when I say KIDS, you really will see GOATS! How cool is that on a hot summer day?
When you get to the bottom of her blog, keep on linking until you get back to where you started. !
Ah this is something I haven’t tried before with my flash! Very pretty results. I’m gonna try it!
Yay Christina! I can’t wait to see what you do. PS — let me know if my instructions were “follow-able” or not. Believe it or not, I USED to be a good writer, but as they say if you don’t use it, you’re gonna lose it.
Thank you for sharing such wonderful information and beautiful images!
Glad you like it, Heather. Thanks for commenting. I hope it’s helpful… Or at least enjoyable.